Introduction

Friends, welcome to the world of embroidery.


I am trying to put in here simple videos that would teach some basic freehand embroidery stitches. I would also put in details of varieties of embroidery of India with pictures - some that I have collected and some that I have done myself.


Nov 21, 2011

Small Project

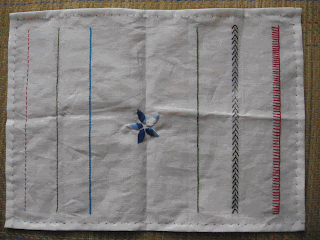
Now is another exciting part of this program. Here I give you a pattern that you can draw/print, transfer to a cloth by tracing and then do a fascinating work with all the stitches you have learnt.

Here is the picture and clues on what stitch to use and where. Hope you will enjoy doing this!! Good luck!! Any art is perfected by lot of practice. So, whenever you find an interesting design, why don’t you turn it into an exciting piece of embroidery??!!


 Hope you will have a great time with this art!!!!

Learn To Trace

Now that you have learnt to embroider some basic stitches, I would be glad to give you instructions on how to trace a simple design and transfer it on to a cloth. Here are the steps with pictures.


Materials Required for Tracing

1.      Design/pattern
     2.      Tracing sheet
3.      Pencil or an empty refill of a ball point pen
4.      Carbon paper – Yellow or White colour
5.      Fabric on which the design need to be transfered
Note: You can get carbon sheets from craft stores as well as stationery stores. Use yello carbon sheet for white cloth and yellow or white carbon sheet for other colour cloths. The blue or black carbon sheets stain the cloth badly if not used with knack.

Method
1. First and foremost, choose a design to embroider. You may search for designs on the Internet or get some basic design books from the craft stores. If you are good at drawing, you can draw your own design. But, I suggest that you make it simple the first time.

Here is the design I choose to embroider.


2. Place the tracing paper over the chosen design.

3. Hold the tracing paper firmly with your left hand. Using a pencil or a ball point pen, trace the design carefully on the tracing sheet.


4. Take the cloth to which you want to transfer the design. Decide where on the cloth you want to transfer the design. Place the carbon sheet with the white side up and the carbon side touching the cloth. Place the tracing paper with the design on the carbon sheet. Be very careful about the position of the design, carbon sheet and the cloth.

5. Now using a semi-sharp pencil or an empty refill of a ball point pen, firmly re-draw the design on the tracing paper. Take care to hold the cloth, carbon sheet and the tracing paper all in one place firmly with your left hand.


6. Once you have drawn the whole design, remove the tracing paper and the carbon carefully.


7. CONGRATS!!! Now you have got the design on the cloth, ready for the embroidery.

Hemming

As hemming is a bit tricky for beginners, I am giving the pictures also, in addition to video.

I suggest that initially you learn hemming using cotton cloth. Also practice hemming in cotton cloth till you master it. You may try the edges of cotton saris and towels also. Once you have mastered the stitch, you can try it in any fabric material.

Here is the video. Below the video I am giving step-by-step pictures also.


1. Trim the edges of the fabric neatly with sharp scissors.
2. Start with one edge. Fold the edge uniformly for about ¼ inch or 0.5cm. Fold this again.

3. Thread a needle with one strand of thread of contrasting to work the edges of the embroidered piece that you have done now. Note that, if you want to do hemming for sari seams or towel seams, you have to use matching thread. For such purposes you need not use the embroidery strands. You can use normal sewing threads.
4. Now start from your right hand side following the pictures given below.


Start with an edge and make a fold of about 1/2 a centimeter or 1/4 inch and crease the edge.


Make a second fold as shown.


Hemming is worked from right to left. Pick up a double folded edge. Follow the picture.


The following picture shows how hemming looks on the right side of the fabric. 


Continue this on all sides to get a neat finish for your embroidered piece.

This is how the embroidered piece will look on the wrong side, once hemming is done on all sides.


And, here is the embroidered piece on the right side. Notice the hemming.